Import
Finances supports importing data from CSV files. A CSV file is a comma-separated values file. Finances requires a date and amount column to successfully import a CSV file.
CSV Format
Finances read the following columns from a CSV file.
date(required) is the date and time of the transaction, e.g. 2017-03-08.amount(required) is the amount of the transaction, e.g. -10.25.category(optional) is the category of the transaction, e.g. Household. If not available, the transaction is assigned to an Uncategorized account. Learn moreaccount(optional) is the account of the transaction, e.g. Cash. If not available, the transaction is assigned to an Uncategorized account. Learn morecounter account(optional) is the counter account of transfer transactions, e.g. Checking. If not available, the transaction is either an income or expense transaction.note(optional) is the description of the transaction, e.g. Buying food.payee(optional) is the payee of the transaction, e.g. Walmart.number(optional) is the transaction number, e.g. 201701.cleared(optional) indication if transaction is cleared, e.g. “*” means cleared; an empty string means uncleared.currency(optional) is the currency of the transaction amount, e.g. USD. If not available, the default currency is used.debit(optional) is the debit value of the transaction, e.g. 10.25. If available, the transaction is an income transaction.credit(optional) is the credit value of the transaction, e.g. 10.25. If available, the transaction is an expense transaction.
For example the following CSV file
| date | account | category | amount |
|---|---|---|---|
| 2017-03-08 | Cash | Household | -5.60 |
will be imported as
2017-03-08
	Assets:Cash        -$5.60
	Expenses:Household  $5.60
Uncategorized transactions
If a CSV file doesn’t include the account or category of a transaction, then Finances will use the account Uncategorized. After importing data, you should assign uncategorized transactions to an income or expense account. Finances doesn’t do that automatically for you. But Finances for Mac makes that really easy. You can edit multiple transactions at once as described here.
Import Settings
Journal — Transactions can be imported into a new or existing journal. If you choose to import into a new journal, the journal will be named after the imported file.
Finances for Mac also lets you import data into a specific account. This is useful if you’re importing a CSV file which doesn’t include account information – like most CSV files from banks do. To do that you have to open a journal, right-click on an account and choose Import. Finances for Mac will then assign transactions without an account to the specified account.
Presets — When importing CSV files into Finances, you can choose from various presets. A preset defines the date format, text encoding, column delimiter, account delimiter and column mapping. There are presets for the following banks and apps.
- Banks: Bawak P.S.K, Erste Bank, Diners Club, mBank S.A., Navy Federal Credit Union, OTP Bank, Raiffeisen, Sparkasse, PayLife
- Apps: Cost, Depit & Credit, Dollarbird, Finances 1, Finances 2, iFinance, Mint, Money, MoneyControl, MoneyWiz, Moni, Pocket Money, Quicken, SEE Finance 2, Spendee, YNAB
If you’re missing a preset for your CSV file, please get in touch.
Account Delimiter – The account delimiter is used to create an hierarchy of accounts from a single string. For example the string A:B results in account A and B. The account B will be a sub-account of A.
Import a CSV file
Mac
- Choose
File→Import… - Select CSV and click
Next - Locate a file and click
Choose - Select a preset for your CSV file or configure the date format, text encoding and delimiter
- Click
Import
iOS
- Open the CSV file, for example in iCloud Drive
- Tap
 and select
 Import with Finances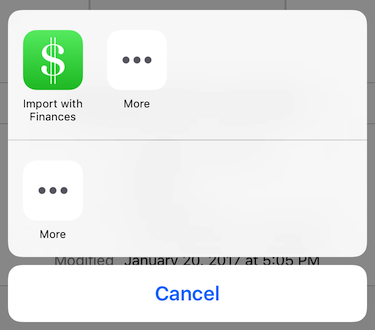
- Select a preset for your CSV file or configure the date format, text encoding and delimiter
- Tap
Import
Migrating from Finances 1
If you’re using Finances 1 and want to import the existing transaction into Finances 2, do the following steps.
- Export your data from Finances 1 as CSV.
- Go to App Settings → Export → Export As CSV
- Import the data into Finances 2.
- Open the CSV file in Finances 2
- Wait for the import to finish – this may take some time.
- Set up the initial account balances – the CSV file doesn’t include the initial account balances.
- Create new account called Opening Balances in the Equity group
- Create an opening transaction
- Update the colors for the Income and Expense accounts – the CSV file doesn’t include the category colors.
Import Failed
There are different reasons why an import fails.
Missing data
The CSV file misses one of the following columns.
dateamount
Learn more about the required columns here.
Wrong date format
Make sure that the date format is configured correctly. (Finances for Mac lets you customize the date format.)
Wrong amount format
The amount uses a different decimal separator than the device’s region setting. For example, the region United States uses the . and Germany the , character as the decimal separator. Update the region in iOS Settings → General → Language & Region accordingly.
Make sure to choose the correct import preset to prevent issues when importing your CSV file. Let us know if there is no preset for your CSV data.